
Admin and Finance users have the ability to submit both local and FX batch payments from the Aspire USD account.
For instructions on how to make batch FX payments, please click here.
For instructions on how to make batch USD payments, please click here.
How to submit batch FX payments
Send money in batches of any of our supported currencies from your USD account! Simply follow these steps and you'll be good to go:
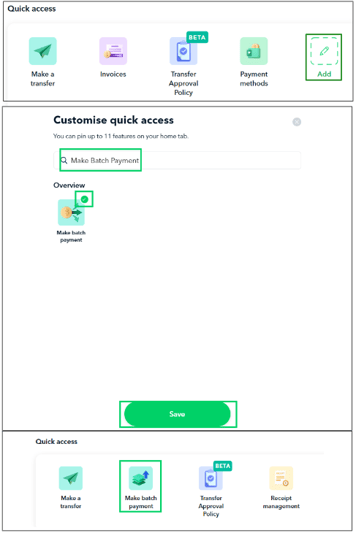
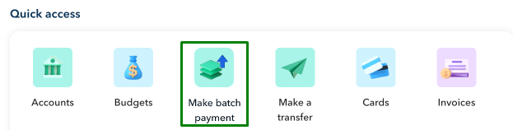
1. From your Quick Access page, select "Add", search for "Make batch payment", check the feature, and click "Save" for convenient and future access.
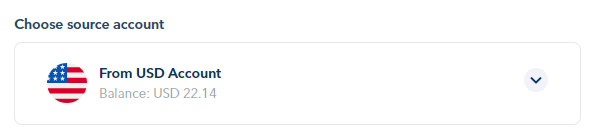
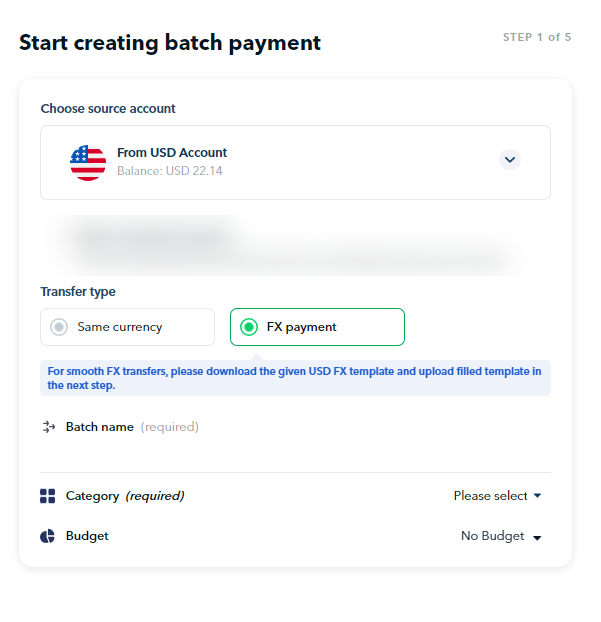
2. Select USD account as the source account.
3. Select FX transfer for payment type, place the name of your batch name, and add the necessary transfer details such as tagging these transfers to a budget & their category
4. Click "Download USD FX Template" and make a copy of the file. Next. fill in the following details:
|
Destination Currency Click here to see the list of supported currencies you can send! |
Currency you want to send to the recipient. |
|
Source amount (amount you want to send in USD) |
Enter the amount that you want to send in either the "Source amount in USD" or "Destination amount in destination currency" field. If both fields are filled, the source amount in USD will be considered. |
| Destination amount (amount you want to send in Destination Currency) | |
| Account holder name | Recipient's account name |
| Bank Country | Recipient's bank country |
| Recipient type | Place "company" or "individual" depending on the account recipient type |
| Account number / IBAN | Recipient's account number or IBAN |
| SWIFT / BIC / BSB Code | Recipient's SWIFT/BIC/BSB Code |
| Address | Recipient's address |
| City | Recipient's city |
| Bank | Bank name; required only for USD to HKD transfers |
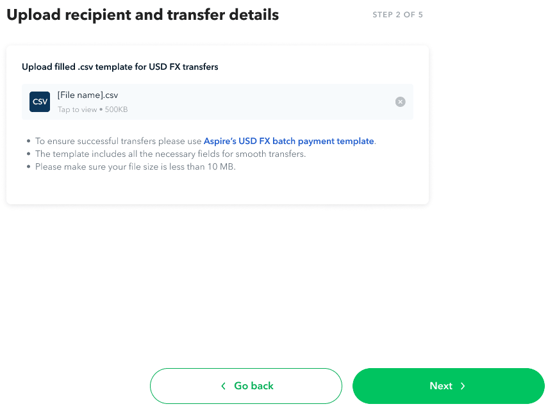
5. Once done, you may download the copy to your device. When downloading Aspire's USD Batch FX payments template, you may select the CSV or XLSX format.
To ensure the numbers under Account number / IBAN are not truncated and still intact, please input them as a "Text Field". Additionally, ensure there is no space, hyphen (-), or other symbol in the Account number / IBAN section. -1.png?width=688&height=440&name=FAQ%20Screenshots%20(3)-1.png)
Next, upload the file, and then click next.
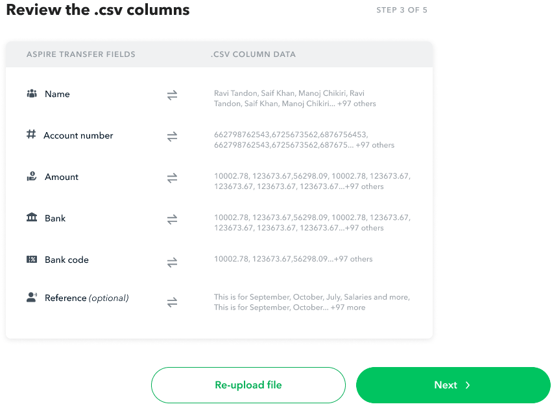
6. If you did not use the Aspire template, you can map your CSV fields to the Aspire transfer fields on this part. If all good, click next.
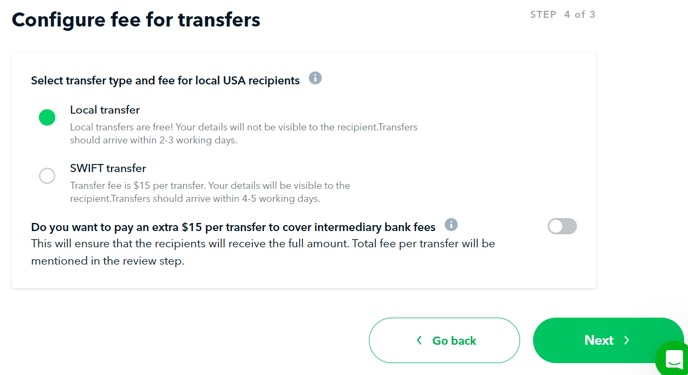
7. Configure the transfer type and fees for transfers. Please refer to the guide below for a list of currencies that can be sent locally and via SWIFT:
List of Supported Currencies you can send in batch from your USD Account:
| Transfer type supported | Destination Currency & Destination Bank Country |
|---|---|
| Local transfers only |
• IDR to Indonesia |
| • PHP to the Philippines | |
| • MYR to Malaysia | |
| • INR to India | |
| SWIFT transfers only | • GBP to UK |
| • THB to Thailand | |
| • AED to UAE | |
| • JPY to Japan | |
| Local and SWIFT supported | • SGD to Singapore |
| • AUD to Australia | |
| • HKD to Hong Kong | |
| • EUR to Austria, Belgium, Cyprus, Estonia, Finland, France, Germany, Ireland, Greece, Italy, Lithuania, Luxembourg, Monaco, Malta, Netherlands, Portugal, Slovakia, Slovenia, Spain, Latvia, Bulgaria, Croatia, Hungary, Iceland, Liechtenstein, Norway, Poland, Romania, Sweden, Switzerland, United Kingdom, and Denmark |
Note!
-
If you select local transfers and one of the destination currencies is not eligible for local transfers, it will be automatically processed through SWIFT transfer instead.
-
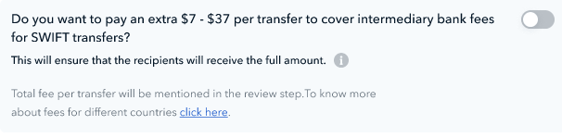
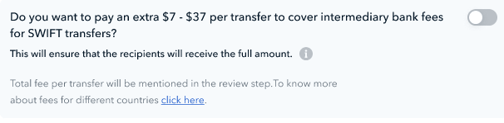
For SWIFT transfers, you have the option to cover the intermediary bank fees by toggling this button. Please be aware that additional fees will be added if you decide to cover the intermediary bank fees.
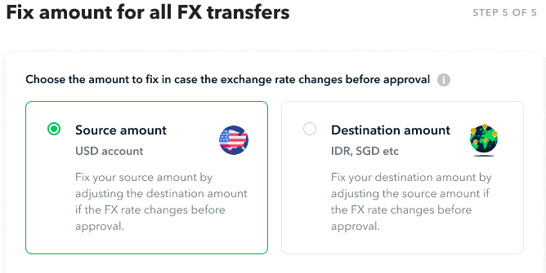
8. Select whether you prefer to fix the Source amount or the Destination amount in case there are any changes in the exchange rate before approval, then click "Review"
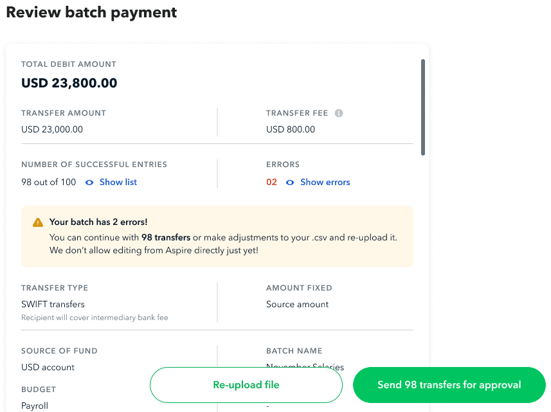
9. You can review the successful transfer list by clicking ![]() . If all good, click "Submit transfers" and that's it!
. If all good, click "Submit transfers" and that's it!
Note!
- To correct the errors, you can make adjustments to your .csv file and re-upload it. Amending the transfer details directly in Aspire is not available yet.

- The batch payment transfers will also follow the transfer approval policy that has been set in place (if any). In this scenario, the approvals needed are determined based on the total amount included in the CSV file, NOT based on each individual transfer.
How to submit batch USD payments
1. Click on "Make batch payments"
2. Select USD account as the source account.
3. Place the name of your batch name.
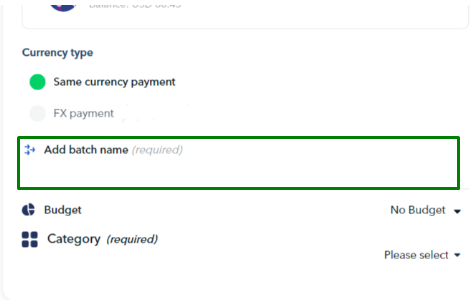
4. Add the necessary transfer details such as tagging these transfers to a budget & their category, then hit "Next"

5. Get a copy of Aspire's USD batch payment template by clicking the text link.

6. A Google sheet will open and you need to make a copy of the sheet for you to use.


7. From your own copy, fill in the following columns.
| SI no: | add a number per transfer |
| Currency | place "USD" |
| A/c Holder Name | account name of the recipient |
| A/c Number (or) IBAN | account number of the recipient |
| Bank SWIFT code | bank SWIFT code |
| Transfer Amount | amount you'll transfer |
| Country Code | please refer to the "Supported Country Codes" tab on the CSV template to find the appropriate country code. |
|
ACH routing number
|
required only for local transfers within US |
|
Recipient type
|
place "company" or "individual" depending on the account recipient type |
| Address | recipient's address |
| City | recipient's city |
|
State/ Province
|
required only for local transfers within US |
|
Postal code
|
required only for local transfers within US |
| Reference (optional) | transfer reference |
8. Once done, you may download the copy to your device. When downloading Aspire's USD Batch payments template, you may select the CSV or XLSX format. 
To ensure the numbers under Account number / IBAN are not truncated and still intact, please input them as a "Text Field". Additionally, ensure there is no space, hyphen (-), or other symbol in the Account number / IBAN section.
Once done, upload the file, and click next.

9. If you did not use the Aspire CSV template, you can map your CSV fields to the Aspire transfer fields on this part. If all good, click next.

10. Configure the transfer type and fees for transfers, then click "Review"
Note! If your recipient's country is outside the USA, only SWIFT transfers are available for use.
In the case where you select Local transfers and have one recipient outside the USA, the transfers to the US will be processed locally, while the recipient outside the USA will be processed via SWIFT.
For SWIFT transfers, you have the option to cover the intermediary bank fees by toggling this button. Please be aware that additional fees will be added if you decide to cover the intermediary bank fees.
11. You can review the transfers by clicking the "Transfer details" tab. If all good, click "Submit transfers" and that's it!

Note!
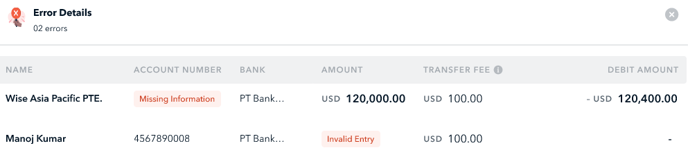
- Unsuccessful transfers can be seen under the "Error details" tab. You can see the rows and error details of the unsuccessful transfers there.
To correct the errors, you can make adjustments to your .csv file and re-upload it. Amending the transfer details directly in Aspire is not available yet.

- The batch payment transfers will also follow the transfer approval policy that has been set in place (if any). In this scenario, the approvals needed are determined based on the total amount included in the CSV file, NOT based on each individual transfer.
Questions? Please log in to the app and reach out in the chat at the bottom right corner of the screen.
Suggestions? Let us know here.