
What is the Sync Expenses feature for NetSuite?
The Sync expense for NetSuite is a feature that allows you to sync any money-out transaction directly from Aspire to NetSuite. You will be able to create Spend money transactions on NetSuite, under the "Bank" > "Cheques module", including all expense details and attachments.
All you have to now do is reconcile the expense on NetSuite!
Who can use the Sync expenses feature with NetSuite?
Any user who has access to the accounting features, i.e Admins and Finance users can access the Sync expenses feature. However, to set up the connection with NetSuite, you will need an Admin account on NetSuite.
What are the fields that will be synced with NetSuite, when using Sync expenses?
You will be able to review and fill all the fields that you need to create a Spend Money transaction on NetSuite, including the NetSuite expense account, Tax rate, and NetSuite standard classifications, directly from Aspire before you sync a transaction. All values along with the receipts attached to the transaction will be synced with NetSuite.
Will custom fields also sync from Aspire to NetSuite?
Currently, only Standard Fields and Classifications (Department, Location and Class) will be synced between Aspire and NetSuite. In case you have custom fields enabled on your NetSuite account, please make sure to make them non-mandatory or set a default value for the custom fields, before syncing your data from Aspire to NetSuite.
GETTING STARTED
Accessing the Sync expenses workflow

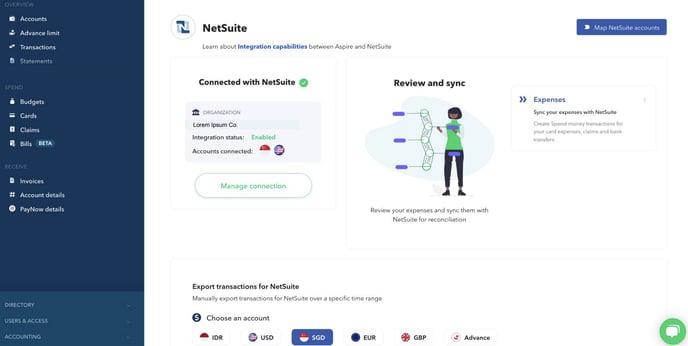
The Sync expenses feature can be accessed from the NetSuite homepage, once you have connected your Aspire account to NetSuite.
You can set up a mapping between your Aspire categories and your NetSuite chart of accounts on this screen. Once you map a NetSuite account to an Aspire category, any expense in that category will automatically be linked to the mapped NetSuite account.
You can always update the NetSuite account for any individual transaction or update this mapping later.
Mapping NetSuite accounts to Aspire categories
When you first click on the Sync expenses workflow, you will be asked to Map your NetSuite accounts.
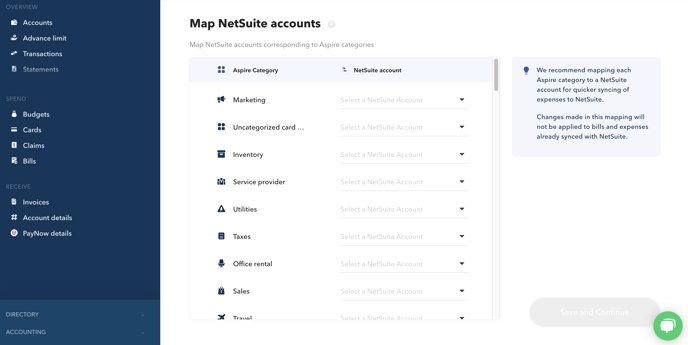
You can set up a mapping between your Aspire categories and your NetSuite chart of accounts on this screen. Once you map a NetSuite account to an Aspire category, any expense in that category will automatically be linked to the mapped NetSuite account.
You can always update the NetSuite account for any individual transaction or update this mapping later.
Reviewing details of a transaction
The Sync expenses workflow has three different statuses - Pending Review, Pending Sync, and Synced. You can switch between these tabs at any time
Once you are on the Sync expenses homepage, you will be able to see the list of transactions in Pending Review status. This list includes all debit transactions from your Aspire accounts, and you can choose to sync the expenses you want.
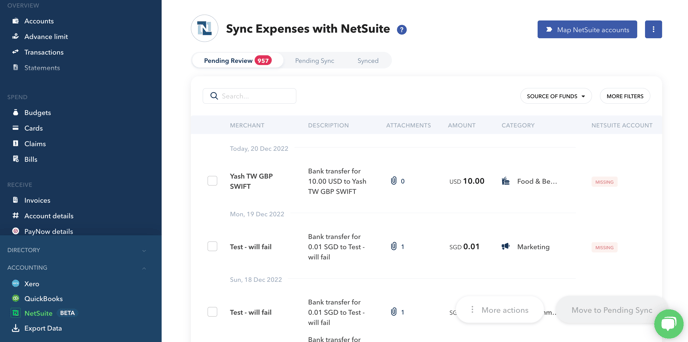
You can click on any expense to view the details of the transaction and update the field values.
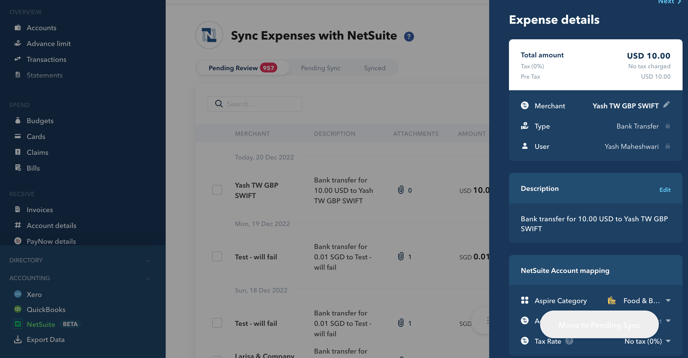
You can update the following values in the Expense details pane:
- Merchant - By default Aspire will create a new contact on NetSuite, with the counterparty name of the transaction. You can either update the merchant to any of your NetSuite contacts or create a new contact on NetSuite, by editing the Merchant name
- Aspire category - The Aspire category can be updated to any of your Aspire categories
- NetSuite Account - The NetSuite account will be automatically filled if you have mapped the Aspire category to a NetSuite account. You can update the value to any of your NetSuite account values
- Tax Rate - The tax rate will default to 0. You can update the value to any of your NetSuite tax rates
- NetSuite Standard Classifications - If you have any standard classifications (Department, Class or Location) enabled on NetSuite, you will be able to fill their values from Aspire
- Internal Notes - You can leave a note for your team in the internal notes section
- Attachments - You can add or remove attachments for your transactions. These will be automatically sent as attachments to the transactions on NetSuite
Once you have reviewed all the details for the transactions you want to sync, you can move these transactions to the next status, by clicking on the Add to Pending Sync button. You can do this by selecting multiple transactions using the checkboxes or from inside the expense details for an individual transaction.
Syncing transactions with NetSuite
Once the transactions are in Pending Sync status, you can sync them to NetSuite, by clicking on the Sync expense button inside the main Pending review tab or inside the Expense details pane.
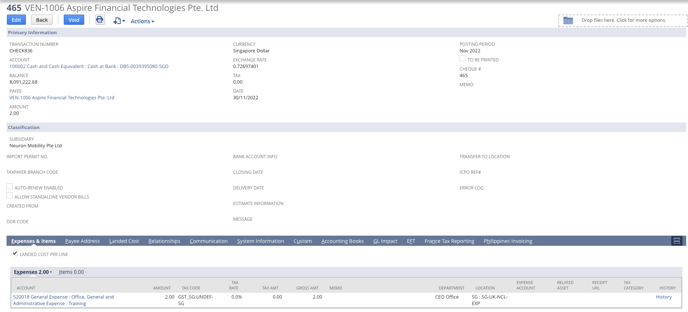
Once a transaction is successfully synced with NetSuite, you can see the transaction in Synced tab. All synced transactions are created under the Bank > Cheques module, with all the relevant expense details and attachments.
FAQs
How can I request receipts for expenses that are missing attachments?
For transactions that are missing their attachments, you can use the request receipts feature. You can request receipts from the expense details pane or the Pending review tab by selecting multiple transactions together.
Some of my expenses in Pending Review are marked as Updated, what does this mean?
This happens when a user updates a transaction after it was already moved to Pending Sync status by you. If the user changes the category or attachments for such transactions, they will be moved back to Pending Review status in the Sync expenses workflow.
You can review this transaction again and sync it with NetSuite, once ready.
Some of my expenses in Synced status are marked as Updated, what does this mean?
When a user updated the category or attachments for a transaction that was already synced with NetSuite, the transaction will be marked as updated in the Synced tab.
You can review the updated details and update the details on NetSuite if required.
Troubleshooting
Aspire is showing "Connected to NetSuite" but showing "Your accounts cannot be connected"
This could happen when NetSuite takes time in sending us a list of all eligible Accounts that can be connected with Aspire. Please refresh the page and check again. Even then if the error does not go away, please disconnect and start the connection again.
I have successfully followed all the steps, even then I am getting an error that connection could not be setup
- This could happen, if you signed in to your NetSuite account with a non-admin account. So make sure that you sign into NetSuite with an Administrator account to setup the connection
- This could also happen if your NetSuite account has reached a limit of creating Access Tokens for integration. If this happens, make sure to delete some unwanted Access Tokens from your NetSuite account by visiting "Setup" > "Users/Roles" > "Access Tokens" > "Edit Token" > "Revoke"
When I synced a transaction, it showed a Sync error in the Pending Sync tab
This happens when some of the required fields by NetSuite are missing on Aspire. Please make sure you have the right details added for Recipient, Tax Rates, and Standard Classification, as per the Subsidiary and Vendor settings on your NetSuite account.
Questions? Please log in to the app and reach out in the chat at the bottom right corner of the screen.
Suggestions? Let us know here.